

If your repositories are on GitLab.com (SaaS), no setup is required.
Modelcode ships with a pre-registered OAuth application. See GitLab
Integration instead.
Prerequisites
- A Modelcode account with the Admin role (see When the Integrations Page Is Visible)
- A GitLab instance reachable from Modelcode over HTTPS with a publicly valid TLS certificate
- Someone who can create an OAuth application in your GitLab, either an instance administrator or a group Owner (see Who Can Create the Application)
How It Works
On GitLab.com, Modelcode uses its own OAuth application. On a self-managed instance that application does not exist, so you register one in your GitLab and give Modelcode its credentials.
The configuration is stored per organization. Once it is saved and connected, everyone in your Modelcode organization works against your instance.
When the Integrations Page Is Visible
Integrations is where self-managed GitLab is configured. Three conditions must all be true for it to appear in the sidebar:The second and third conditions are why a brand-new organization always sees
Integrations before it links its first repository. That is the window in which
you point Modelcode at your own GitLab instance.
Setup Overview
Step 1: Enter Your GitLab URL
- In the Modelcode sidebar, click Integrations
- Find the GitLab section. Its description reads “Set the URL of your self-managed or Dedicated GitLab instance. Leave blank only for gitlab.com.”
- In GitLab URL, enter the base web URL of your instance, for example
https://gitlab.example.com
https://example.com/gitlab. A trailing slash is fine; Modelcode strips it.
Once a custom URL is entered, the GitLab section expands to reveal the redirect URI, the required scopes, and the credential fields:
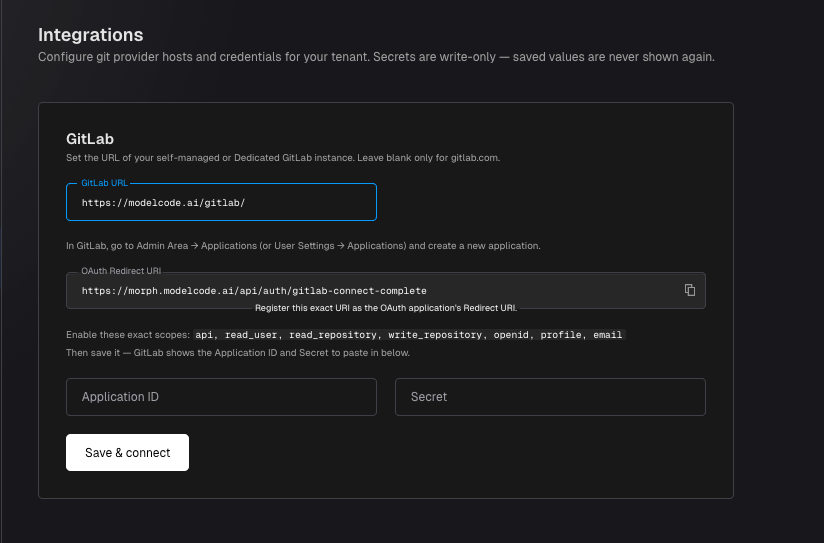
You do not need to configure an API URL or a clone host. Modelcode derives both
from GitLab URL. The API base becomes
<GitLab URL>/api/v4.Step 2: Copy the OAuth Redirect URI
Once a custom GitLab URL is entered, Modelcode displays a read-only OAuth Redirect URI field with a copy button. Its hint reads “Register this exact URI as the OAuth application’s Redirect URI.” The value takes this form:Step 3: Create the OAuth Application in GitLab
Who Can Create the Application
GitLab supports three kinds of OAuth application. They differ only by who owns them and who can create them.Create the Application
- Sign in to your GitLab instance as an administrator (or as an Owner of the target group)
- Go to the Applications page for the ownership level you chose above, then click New application
- Name: use something recognizable to your users, such as
Modelcode - Redirect URI: paste the OAuth Redirect URI you copied in Step 2
- Confidential: leave this checked. Modelcode exchanges the authorization code server-side using the application secret.
- Trusted (instance-wide applications only, optional): check this to skip the per-user consent screen for everyone on the instance
- Scopes: enable exactly the scopes listed below
- Click Save application
Required Scopes
Enable these seven scopes, and no others:Do not add
read_registry or write_registry. Modelcode requests those against
GitLab.com only, and some self-managed versions reject them as unknown scopes.Step 4: Paste the Application ID and Secret
Back on the Modelcode Integrations page, in the GitLab section:- Application ID: paste the Application ID from GitLab (the field hint reads “From GitLab → Applications.”)
- Secret: paste the application secret
- Click Save & connect
The Secret is write-only. After saving, the field shows a masked
•••••••• placeholder and the stored value is never displayed again. Leaving it
blank on a later save keeps the existing secret; to rotate it, paste a new value
and save again.Step 5: Authorize the Application
On your GitLab instance, review the requested scopes and click Authorize. If an administrator marked the application as Trusted, this screen is skipped.- On success, you land on the Modelcode Projects page with GitLab connected. Returning to Integrations shows a green Configured tag on the GitLab section.
- On failure, you return to Integrations with a Connection failed alert: “GitLab rejected the connection (reason). Check the Application ID, Secret, and Redirect URI, then try again.”
Managing the Configuration
The GitLab section shows one of two status tags:
The primary button adapts to the current state:
Network Requirements
The integration requires traffic in both directions.Troubleshooting
Integrations is missing from the sidebar
Check each condition in When the Integrations Page Is Visible: the feature must be enabled for your organization, your role must be Admin, and your organization must not already be connected to a public cloud provider with no custom configuration.The OAuth Redirect URI field never appears
The field is shown only for a custom host. Confirm GitLab URL is filled in and is notgitlab.com.
Modelcode rejects your Application ID on gitlab.com
You entered an Application ID and Secret while GitLab URL is stillgitlab.com (or blank). On GitLab.com, Modelcode always uses its own application. Either set your self-managed URL or clear the credentials.
Connection failed — your credentials were not saved (not_configured)
The Application ID was not saved. Re-enter the Application ID and Secret, then click Save & connect.
Connection failed — GitLab refused the credentials (token_exchange_failed)
The most common causes, in order:
- The Redirect URI registered in GitLab does not exactly match the one shown in Modelcode
- The Secret is wrong or was rotated in GitLab without being updated in Modelcode
- Modelcode cannot reach
https://<your-gitlab>/oauth/token, so check egress and TLS
Connection failed — the authorization took too long (invalid_state, expired_state, session_expired)
The authorization took longer than 10 minutes, or your Modelcode session expired mid-flow. Return to Integrations and click Connect GitLab again.
Connection failed — the GitLab URL changed mid-flow (host_mismatch)
The GitLab URL changed between starting and completing the authorization. Refresh Integrations and retry.
Connection failed — Modelcode could not read your GitLab profile (gitlab_user_fetch_failed)
Modelcode authorized successfully but could not read the user profile from https://<your-gitlab>/api/v4. Verify the API is reachable from Modelcode and that the application includes the read_user scope.
Connection failed — your organization uses a different git provider (provider_mismatch)
Your organization is locked to a different git provider. Contact support@modelcode.ai to change it.
No repositories appear after connecting
Repository access follows the GitLab account that completed the authorization. Verify that account can see the repositories in GitLab, then click Reconnect GitLab to refresh the token.Next Steps
- GitLab Integration: Create projects, understand GitLab principals, and approve migration plans
- Quickstart: Create your first migration project
- Define Modernization Goals: Write effective goals for your migration