Validation level applies to the whole project and affects every milestone. You set it once during onboarding and can change it later from the project overview.
The Three Levels at a Glance
| Dimension | Low — Fast | Medium — Balanced | High — Thorough |
|---|---|---|---|
| Target build + unit tests | ✅ Best-effort | ✅ | ✅ |
| Full target lifecycle (run, health checks) | ❌ | ✅ | ✅ |
| Functional testing | ❌ Off | ⚠️ Target-only | ✅ Full (baseline captured + verified) |
| Acceptance criteria | ❌ None | ⚠️ Target-only (you author) | ✅ Full (baseline captured + verified) |
| Source environment setup | ❌ | ❌ | ✅ Upfront |
| Speed | 🚀 Fastest | ⚖️ Balanced | 🐢 Slowest |
| Confidence | Low | Medium | High |
Low — Fast
The fastest path. Morph builds the target and runs unit tests each milestone on a best-effort basis, then moves on. What you gain- The shortest milestone runtimes and the quickest route to a complete roadmap.
- No environment setup required before you start.
- No app-run or health-check lifecycle — the migrated app is never actually started and exercised.
- No functional testing, so deviations from the behavior described in your spec go undetected.
- No acceptance criteria — there is no formal definition of “done” beyond compilation and unit tests.
Medium — Balanced
A middle ground that proves the target actually runs, without requiring Morph to stand up your source application’s environment. What you gain- Everything in Low, plus the full target lifecycle: Morph builds, runs, and health-checks the migrated app each milestone.
- Target-only functional testing — tests are generated and executed against the migrated app to confirm it behaves sensibly.
- Target-only acceptance criteria — you author absolute-threshold quality gates (for example, “line coverage ≥ 80%”) that Morph enforces on the target.
- No captured baseline. Tests and acceptance criteria confirm the modernized app works and meets the thresholds you author, but Morph never observes the source app’s real behavior — so you define what “correct” means up front, rather than having it captured for you.
- No source environment setup.
High — Thorough
The strongest guarantee. Morph sets up your source application upfront, captures its real behavior as a baseline, and verifies the modernized app behaves as the spec describes. What you gain- Everything in Medium, plus upfront source environment setup so the source app can be run and observed.
- Full functional testing — Morph captures a behavioral baseline from your source app, runs the modernized app, and verifies it behaves as the spec describes, surfacing any regression side by side.
- Full acceptance criteria — Morph discovers metrics on the source app, captures their baseline values, and translates them into target-side gates, on top of any criteria you author.
- The most setup effort and the longest milestone runtimes.
- You must provide enough detail for Morph to stand up the source environment (dependencies, run commands, credentials, and so on).
Choosing the Right Level
Ask yourself two questions:- Does the modernized app need to behave exactly as described in the spec? If yes, choose High — it’s the only level that captures a behavioral baseline from your source app and verifies against it.
- Can your source application be run in an environment Morph can access? If no, High isn’t viable; choose Medium to still validate that the target runs and meets your authored thresholds.
| Your priority | Recommended level |
|---|---|
| Behaving exactly as described in the spec | High |
| Confidence the target runs correctly, no source app available | Medium |
| Maximum speed, minimal setup | Low |
Setting the Validation Level
You configure the validation level from the Validation Level panel in the project overview. During onboarding it appears as a guided next step.Open the Validation Level panel
From the project overview, open the Validation Level configuration panel.
Choose a level
Select Low, Medium, or High. The panel summarizes what each option includes so you can compare the tradeoffs in context.
If you don’t pick a level, projects default to High — the safest choice when behavioral equivalence matters. Your organization may configure a different default.
Per-Milestone Validation Indicator
Each milestone card on the Roadmap shows a small validation level indicator below its title — a bar-chart icon with a label (Low, Mid, or High). This indicates the effective validation level that is currently applied and with which the milestone will run.
- The milestone’s own recorded validation level (stamped at execution time), or
- The project-level validation level (if the milestone hasn’t run yet).
Changing the Level Between Milestones
You can upgrade or downgrade the validation level between milestones. Open the Validation Level panel, select a new level, and click Save. A confirmation dialog explains what will happen before any change is applied.Upgrading
When you upgrade to a higher level:| Scenario | What happens |
|---|---|
| No milestones merged yet | The new level applies to the next milestone. No extra action needed. |
| Milestones already merged (upgrade to Medium) | automatically launches an ad-hoc validation run on the last merged milestone to cover the functional tests and acceptance criteria that the lower level skipped. |
| Upgrade to High | A short setup chat opens first to capture origin environment details and acceptance criteria. After setup completes, an ad-hoc validation run is launched on the last merged milestone. |
Downgrading
Lowering the validation level reduces checks for future milestones only. Completed milestones are not affected — their validation results stay as-is.On-Demand Validation Rerun
After a milestone is merged, you may see a Rerun Validation Suite button appear between milestones on the Roadmap. This lets you retroactively validate a merged milestone at the project’s current validation level.When It Appears
The rerun trigger is shown when all of these conditions are true:- The previous milestone is merged.
- The project’s current validation level is higher than the level recorded on that milestone.
- No ad-hoc validation is already running or pending for that milestone.
- The next standard milestone hasn’t started yet.
How It Works
-
Click Rerun Validation Suite on the divider between milestones.
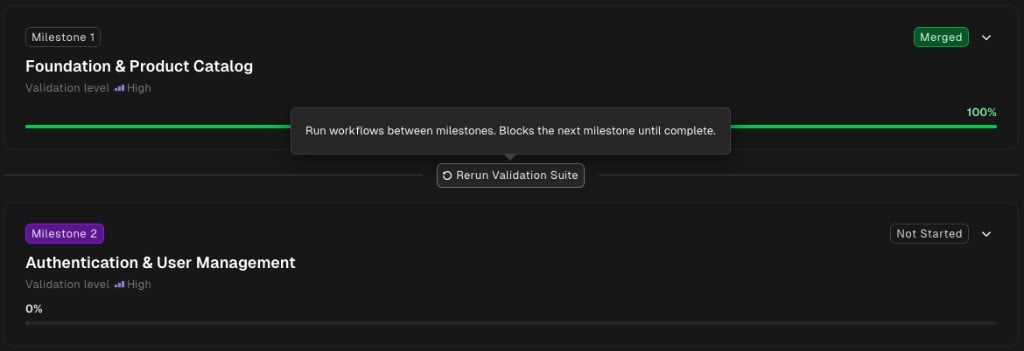
- creates an ad-hoc validation milestone (e.g., “Validation 2.1”) that reruns the full validation suite at the project’s current level.
-
The ad-hoc milestone appears in the Roadmap and shows progress like any milestone — with review tasks, test results, and status badges.
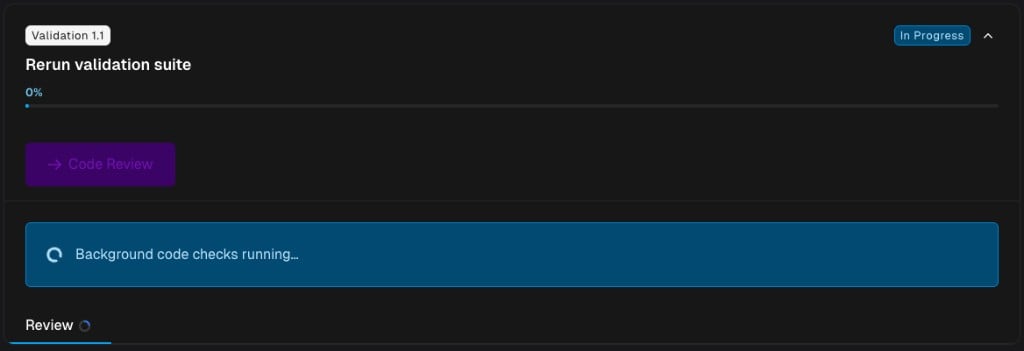
- The next standard milestone is blocked until the ad-hoc validation completes.
The rerun button requires the
executions:create permission. If you don’t see it, check with your workspace admin.If a Validation Run Fails
If the ad-hoc validation encounters an error, the milestone card shows a failure alert with a Retry button. Click it to re-run the validation suite without creating a new milestone.Related Docs
Functional Testing
How Morph generates, runs, and compares functional tests
Acceptance Criteria
Quantitative quality gates enforced on every milestone
Lifecycle Setup
Configure how your project builds and runs
Milestones & Tasks
The three-step process that validation level shapes