Prerequisites
- A Modelcode account (sign up at modelcode.ai)
- A GitLab.com (SaaS) account — not a self-hosted instance
- At least one repository you want to work with
How It Works
Modelcode uses GitLab OAuth to authenticate and access your repositories:- Sign in with GitLab — You authenticate with your GitLab account on Modelcode’s login page. This establishes your identity and grants Modelcode permission to access your repositories.
- Repository access — Once signed in, Modelcode can list and read the repositories your GitLab account has access to. No separate app installation is required — your OAuth token provides access.
| GitHub | GitLab | |
|---|---|---|
| Sign-in | GitHub account via identity provider (authentication only) | GitLab OAuth (identity + repo access) |
| Repo access | Separate GitHub App installation | Included in OAuth sign-in |
| Publish target | GitHub account (installation) | GitLab principal (user, group, or project) |
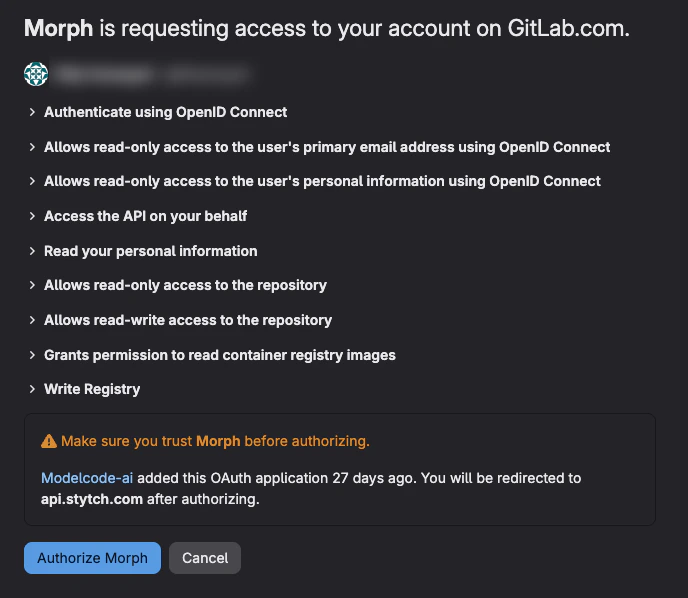
GitLab’s consent screen lists the full set of permissions for the Morph OAuth
application (for example API access, repository read/write, OpenID Connect
profile and email, and registry access where applicable). These are required
so Modelcode can sign you in, list repositories, and push migration branches.
Signing In with GitLab
Step 1: Choose GitLab as Your Provider
- Go to modelcode.ai
- On the login page, click Continue with GitLab

Step 2: Authorize Modelcode
On GitLab, the OAuth application appears as Morph (the Modelcode integration).- Review the permissions Morph is requesting (API access, repository read/write, profile, and related scopes as shown)
- Click Authorize Morph to grant access
- You’ll be redirected back to Modelcode
Creating a Project with GitLab Repositories
If you haven’t connected GitLab yet, you’ll see a Connect GitLab button on the Projects page.
- Click Create Project on the Projects page
- Enter a project name (auto-filled from your first repository name)
- In the repository dropdown, select one or more repositories from your GitLab account
- For each repository, confirm or change the origin branch
- Set a feature branch name (prefixed with
morph-) - Click Create Project
If the Repository Dropdown Is Empty
If no repositories appear after connecting GitLab:- Verify your GitLab account has access to the repositories you expect
- Check that the OAuth authorization was completed successfully
- Try refreshing the page — the repository list is fetched from GitLab via Modelcode’s backend
Understanding GitLab Principals
When Modelcode publishes migration output (creates branches, pushes code) to GitLab, it uses a principal to determine credentials and permissions. A principal represents the GitLab entity that owns or manages the target repository.Principal Types
| Type | Description | Example |
|---|---|---|
| User | A personal GitLab user account | johndoe (user) |
| Group | A GitLab group or subgroup | my-org/backend-team (group) |
| Project | A specific GitLab project | my-org/my-repo (project) |
path (type) — for example, my-company/platform (group).
How Principals Are Resolved
When you create a project or approve a migration plan, Modelcode resolves principals in the following order:- Namespace match — Matches the repository’s GitLab namespace ID and kind (user or group)
- Declared user — Matches an explicitly declared user principal on the repository
- Project ID — Matches the GitLab project ID directly
- Group path — Matches a group token whose path is a parent of the repository’s namespace
Approving a Migration Plan
When reviewing and approving a migration plan for a GitLab project:- Open Project Knowledge from the Roadmap (Modernization → Project Knowledge) with Project Spec selected
- Review the generated migration plan
- For each new repository in the plan, a GitLab principal dropdown appears
- Select the principal (user, group, or project) that should own the published repository
- Click Approve
Troubleshooting
”No repositories found”
If Modelcode says GitLab is connected but no repositories are available:- Verify your GitLab account has access to the repositories you expect
- The OAuth token may have expired - if you see a Your GitLab connection is no longer active banner on the Projects page, click Reconnect GitLab
- Check that the repositories are not archived or restricted in GitLab

”GitLab principal” dropdown is empty
If the principal dropdown shows no options when approving a migration plan:- Your GitLab OAuth session may have expired — refresh the page
- If the issue persists, sign out and sign in again with GitLab to refresh the OAuth token
- Verify that your GitLab account has the necessary permissions on the target group or project
Modelcode derives principals from both stored tokens and your repository list.
If your repository list loads successfully, principals should appear
automatically. An empty dropdown usually indicates an authentication issue.
”Missing GitLab principal context”
If you see this error during project creation:- The repository metadata may be incomplete — close the modal, refresh the page, and try again
- Reconnect GitLab by signing out and signing in again
- Ensure your GitLab account has at least Developer access to the repository
”Failed to load GitLab principal tokens”
This indicates a backend communication issue:- Refresh the page and try again
- If the error persists, check your network connection
- Contact support if the issue continues
”We couldn’t load GitLab accounts for publishing”
This message appears in the project overview when principals cannot be loaded:- Reconnect GitLab using the same flow as when you add a repository
- Refresh the page after reconnecting
- If you already use GitLab in this project, a simple page refresh may resolve the issue
Next Steps
- Quickstart — Create your first migration project
- Define Modernization Goals — Write effective goals for your migration
- Modernization Instructions — Learn how to review and approve your migration plan