> ## Documentation Index
> Fetch the complete documentation index at: https://docs.modelcode.ai/llms.txt
> Use this file to discover all available pages before exploring further.
# Lifecycle Setup
> Configure how your project builds, runs, and tests
export const ProductName = "The Morph Platform";
export const productName = "the Morph Platform";
Every project needs a **Lifecycle Setup** - the scripts, environment variables, and documentation that define how the application installs dependencies, builds, runs, passes a health check, and tests. {ProductName} uses this configuration to validate your setup, run functional tests, and verify milestone output.
## How your lifecycle gets set up
How much you configure here depends on the **[lifecycle strategy](/setup/build-environment/lifecycle-strategy)** you picked during onboarding:
* **Managed** - The agent **auto-discovers** your install, build, and run scripts by analyzing the codebase, attempting to start the application, and recording what works. You review the result, correct anything it got wrong, and validate. You don't write the scripts from scratch.
* **Connect** - There are no install, build, or run scripts to configure. {ProductName} talks to an app you keep running, so this side only needs a **base URL** and a **health check** command.
In both cases the agent does the heavy lifting: discovery proposes a working configuration and your job is to review and validate it, not to author it line by line.
The lifecycle strategy is chosen once during onboarding. If you're not sure which one you picked or what each implies, see [Lifecycle Strategy](/setup/build-environment/lifecycle-strategy).
***
## How It Works
{ProductName} maintains lifecycle configurations at the project level, with separate entries for origin and target:
* **Origin** - How the source application builds and runs. Discovered during onboarding and used as the behavioral baseline for functional testing.
* **Target** - How the destination application builds and runs. Discovered automatically during the foundation milestone (Milestone 1) and used to verify that migrated code works correctly.
For **Modelcode Hosted** projects, {productName} automatically discovers the lifecycle configuration by analyzing the codebase, attempting to start the application, and recording what works. You review the result, make corrections if needed, and validate.
For **Self Hosted** projects (where you install **ModelDaemon** on your own machine to execute builds and tests), you configure lifecycle commands manually during onboarding. See [Self Hosted](/setup/build-environment/self-hosted-daemon) for that flow.
***
## The Lifecycle Setup Page
Open the lifecycle setup from the roadmap sidebar by clicking the **Lifecycle** entry. The drawer shows **Origin** and **Target** tabs - one for each side of the migration.
 Each tab contains the same three sections:
### Scripts
Ordered shell scripts that bring your application to a healthy, running state. Common scripts include:
| Script | Purpose |
| --------------- | -------------------------------------------------------------------------------- |
| **install** | Install dependencies (e.g., `npm install`, `pip install -r requirements.txt`) |
| **build** | Compile or bundle the application |
| **run** | Start the application process |
| **healthcheck** | Verify the application is responding (e.g., `curl http://localhost:3000/health`) |
| **test** | Run the project's test suite |
Each tab contains the same three sections:
### Scripts
Ordered shell scripts that bring your application to a healthy, running state. Common scripts include:
| Script | Purpose |
| --------------- | -------------------------------------------------------------------------------- |
| **install** | Install dependencies (e.g., `npm install`, `pip install -r requirements.txt`) |
| **build** | Compile or bundle the application |
| **run** | Start the application process |
| **healthcheck** | Verify the application is responding (e.g., `curl http://localhost:3000/health`) |
| **test** | Run the project's test suite |
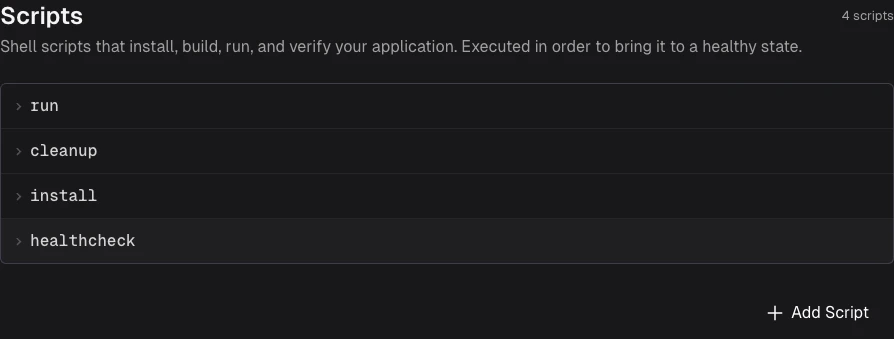 Click a script name to expand it. The expanded view shows:
* **Inline code editor** - Edit the script content directly. Scripts are executed as shell commands.
* **Logs** - View the stdout output from the last validation run.
* **Errors** - View stderr output. A bug icon appears on the script header if the last run failed with stderr output.
Click a script name to expand it. The expanded view shows:
* **Inline code editor** - Edit the script content directly. Scripts are executed as shell commands.
* **Logs** - View the stdout output from the last validation run.
* **Errors** - View stderr output. A bug icon appears on the script header if the last run failed with stderr output.
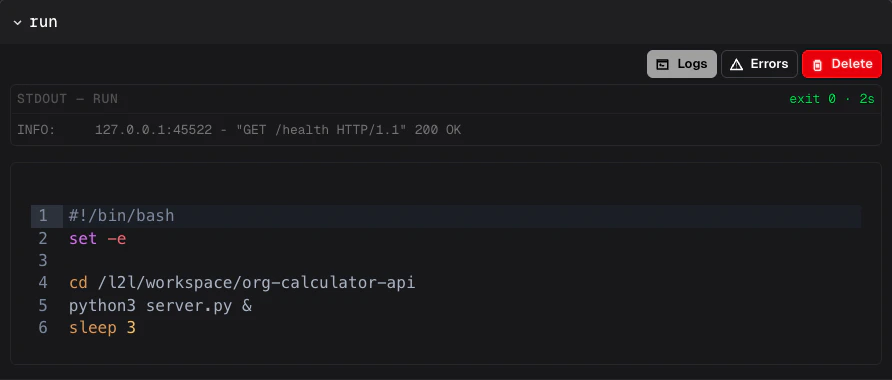 To add a script, click **Add Script** at the bottom of the list, enter a name, and press Enter. To remove a script, expand it and click **Delete**.
### Environment Variables
Key-value pairs your application needs at build or runtime. Variables discovered from the codebase are pre-populated; you can add, edit, or remove them.
Variables marked as **secrets** are encrypted at rest. Tick the **Secret** checkbox on a variable to mark it as a secret; once marked, the value is masked and a show/hide eye icon appears so you can reveal it when needed.
### Lifecycle Document
A markdown overview describing how the application is structured, the execution order of scripts, and how each phase fits together. For Modelcode Hosted projects, this document is auto-generated during lifecycle discovery. You can edit it to add context the agent might have missed.
***
## Validation Status
The status bar at the top of the lifecycle setup page shows the current validation state:
| Status | Meaning |
| ------------------------ | ------------------------------------------------------------------------------------------------------------------------------------------------------------------ |
| **Validated** | All scripts ran successfully. The application started and passed the health check. |
| **Draft - Needs Review** | {ProductName} discovered a configuration but could not get the application running and healthy automatically. Review the scripts, fix any issues, and re-validate. |
| **Failed** | Validation ran but one or more scripts failed. Check the error output for details. |
| **Pending** | Validation has not run yet or is queued. |
To add a script, click **Add Script** at the bottom of the list, enter a name, and press Enter. To remove a script, expand it and click **Delete**.
### Environment Variables
Key-value pairs your application needs at build or runtime. Variables discovered from the codebase are pre-populated; you can add, edit, or remove them.
Variables marked as **secrets** are encrypted at rest. Tick the **Secret** checkbox on a variable to mark it as a secret; once marked, the value is masked and a show/hide eye icon appears so you can reveal it when needed.
### Lifecycle Document
A markdown overview describing how the application is structured, the execution order of scripts, and how each phase fits together. For Modelcode Hosted projects, this document is auto-generated during lifecycle discovery. You can edit it to add context the agent might have missed.
***
## Validation Status
The status bar at the top of the lifecycle setup page shows the current validation state:
| Status | Meaning |
| ------------------------ | ------------------------------------------------------------------------------------------------------------------------------------------------------------------ |
| **Validated** | All scripts ran successfully. The application started and passed the health check. |
| **Draft - Needs Review** | {ProductName} discovered a configuration but could not get the application running and healthy automatically. Review the scripts, fix any issues, and re-validate. |
| **Failed** | Validation ran but one or more scripts failed. Check the error output for details. |
| **Pending** | Validation has not run yet or is queued. |
 When the status is **Draft**, a warning banner appears with the validation output so you can see what went wrong:
***
## Authentication Handling
When {productName} discovers or validates your lifecycle, it probes API routes beyond the health endpoint to check whether the application has authentication that could affect automated testing.
### What Morph handles automatically
{ProductName} can detect and handle two types of authentication without manual intervention:
* **Disable flags** — Many frameworks offer an environment variable or config setting that disables authentication in development or test mode (for example `DISABLE_AUTH=true`, `AUTH_ENABLED=false`, or framework-specific flags like `EnableTesting`). When {productName} finds one, it registers the variable, restarts the application, and verifies that protected endpoints are now accessible.
* **Static tokens** — If the application uses a fixed API key or Bearer token (e.g. an `X-API-Key` header), {productName} prompts you for the token value, stores it as an encrypted secret, and adds a verification script that confirms the token works.
In both cases, {productName} adds an **authcheck** lifecycle script that hits a protected endpoint with the configured auth method and fails if authentication is not working. This script runs alongside your other lifecycle scripts during every validation.
### What requires your attention
* **Session-based login (username/password)** — Applications that require a `POST /login` call to obtain a session cookie or Bearer token. {productName} reports this as detected but unsupported for automated bypass.
* **OAuth / SSO / MFA** — External identity provider flows that involve browser redirects, third-party consent screens, or multi-factor challenges. These cannot be automated.
When {productName} detects these types, it documents the finding and shows an **"Unsupported Authentication Detected"** banner on the lifecycle setup page. The banner explains that validation steps requiring authenticated access may be skipped, along with details about the specific auth type found.
**{ProductName} cannot bypass login flows, external identity providers, or multi-factor challenges.** If your application relies on OAuth, SSO, MFA, or a `POST /login` session handshake, those auth-protected routes will be **unreachable during automated testing**. You have two options:
1. **Follow one of the [manual steps below](#manual-steps-for-unsupported-auth-types)** to configure authentication yourself (e.g. add a disable flag, seed a test user, add a login script, or use the connect strategy).
2. **Accept reduced functional testing coverage.** {ProductName} will still validate install, build, run, and health check — only runtime behavior verification of auth-gated endpoints is skipped.
### Manual steps for unsupported auth types
If {productName} can't figure out your application's auth automatically, you can prepare the environment yourself so that protected surfaces become reachable. Below are common patterns — pick the one that fits your stack.
#### Add a test-mode environment variable
Most frameworks have a way to relax or skip authentication in non-production environments. Add that variable to the **Environment Variables** section of the lifecycle setup page, for example:
| Framework / Pattern | Variable | Value |
| -------------------- | ------------------------ | --------------------- |
| Generic disable flag | `DISABLE_AUTH` | `true` |
| Rails / Devise | `RAILS_ENV` | `test` |
| Django | `DJANGO_SETTINGS_MODULE` | `myapp.settings.test` |
| Spring Boot | `SPRING_PROFILES_ACTIVE` | `test` |
| .NET | `ASPNETCORE_ENVIRONMENT` | `Development` |
| Express / Passport | `AUTH_ENABLED` | `false` |
{ProductName} re-validates after every environment variable change.
#### Seed a test user and add a login script
For session-based auth, you can create a test user and add a lifecycle script that logs in before tests run:
1. **Add a `bootstrap` script** (ordered before `healthcheck`) that seeds a test user:
```bash theme={null}
# seed a test user — adjust for your ORM / CLI
cd $WORKSPACE_DIR
python manage.py shell -c "
from django.contrib.auth.models import User
User.objects.get_or_create(username='testuser', defaults={'email':'test@test.com'})
u = User.objects.get(username='testuser')
u.set_password('testpass')
u.save()
"
```
2. **Add an `authcheck` script** (ordered after `healthcheck`) that obtains a session token and verifies a protected route:
```bash theme={null}
# login and verify a protected endpoint
TOKEN=$(curl -s -X POST http://localhost:8000/api/login \
-H 'Content-Type: application/json' \
-d '{"username":"testuser","password":"testpass"}' \
| jq -r '.token')
curl -sf -o /dev/null http://localhost:8000/api/protected \
-H "Authorization: Bearer $TOKEN" \
|| { echo "Auth check failed"; exit 1; }
```
3. **Store the credentials** (`testuser` / `testpass`) as **secrets** in the environment variables section so they are encrypted at rest.
#### Use the connect strategy with a pre-authenticated instance
When none of the above options work (e.g. OAuth with an external IdP that cannot be mocked), consider the **[connect strategy](/setup/build-environment/lifecycle-strategy#you-run-your-app-connect)**. Run the application yourself with authentication already configured, and point {productName} at the live, authenticated instance. {ProductName} skips install/build/run and only needs a base URL and health check.
***
## Editing and Re-validating
After making changes to scripts, environment variables, or the lifecycle document:
1. Click **Save Changes** to persist your edits
2. Click **Re-validate** to run the full validation sequence again
The **Re-validate** button automatically saves any unsaved changes before starting validation. During validation, a progress banner shows the current state.
If you only need to fix a small script error, edit the script inline, and click **Re-validate** - it handles saving for you.
***
## Lifecycle Discovery
For Modelcode Hosted projects, {productName} discovers the lifecycle configuration automatically at two points:
1. **During onboarding** - After you select the Modelcode Hosted build environment, {productName} analyzes the origin repository, identifies how to install, build, and run it, and creates the origin lifecycle configuration.
2. **During the foundation milestone** - When Milestone 1 starts, {productName} runs a lifecycle discovery step for the target repository. This ensures the target application can build and run before the agent begins writing migration code.
Discovery uses the codebase structure, dependency files, and common framework conventions to generate scripts. It then executes each script in sequence to verify the configuration works end to end.
If discovery cannot get the application healthy, the configuration is saved as **Draft** so you can review and correct it manually.
***
## Tips
* **Check the Errors tab first.** When a script fails, the stderr output usually points directly at the problem - a missing dependency, a wrong port, or a typo in the command.
* **Keep scripts minimal.** Each script runs in a fresh shell process. If two commands need to share shell context (e.g., activating a virtual environment before running a command), concatenate them with `&&` in a single script.
* **Use environment variables for configuration.** Avoid hardcoding ports, database URLs, or API keys in scripts. Set them as environment variables so they are easy to change and can be encrypted if sensitive.
***
## Related Docs
Choose whether the agent builds and runs your app, or connects to a running one
Run ModelDaemon on your own infrastructure for projects with private dependencies
Build environment terminology and mental model
How lifecycle discovery fits into the foundation milestone
How lifecycle configuration enables functional test execution, and where lifecycle script results are reported
When the status is **Draft**, a warning banner appears with the validation output so you can see what went wrong:
***
## Authentication Handling
When {productName} discovers or validates your lifecycle, it probes API routes beyond the health endpoint to check whether the application has authentication that could affect automated testing.
### What Morph handles automatically
{ProductName} can detect and handle two types of authentication without manual intervention:
* **Disable flags** — Many frameworks offer an environment variable or config setting that disables authentication in development or test mode (for example `DISABLE_AUTH=true`, `AUTH_ENABLED=false`, or framework-specific flags like `EnableTesting`). When {productName} finds one, it registers the variable, restarts the application, and verifies that protected endpoints are now accessible.
* **Static tokens** — If the application uses a fixed API key or Bearer token (e.g. an `X-API-Key` header), {productName} prompts you for the token value, stores it as an encrypted secret, and adds a verification script that confirms the token works.
In both cases, {productName} adds an **authcheck** lifecycle script that hits a protected endpoint with the configured auth method and fails if authentication is not working. This script runs alongside your other lifecycle scripts during every validation.
### What requires your attention
* **Session-based login (username/password)** — Applications that require a `POST /login` call to obtain a session cookie or Bearer token. {productName} reports this as detected but unsupported for automated bypass.
* **OAuth / SSO / MFA** — External identity provider flows that involve browser redirects, third-party consent screens, or multi-factor challenges. These cannot be automated.
When {productName} detects these types, it documents the finding and shows an **"Unsupported Authentication Detected"** banner on the lifecycle setup page. The banner explains that validation steps requiring authenticated access may be skipped, along with details about the specific auth type found.
**{ProductName} cannot bypass login flows, external identity providers, or multi-factor challenges.** If your application relies on OAuth, SSO, MFA, or a `POST /login` session handshake, those auth-protected routes will be **unreachable during automated testing**. You have two options:
1. **Follow one of the [manual steps below](#manual-steps-for-unsupported-auth-types)** to configure authentication yourself (e.g. add a disable flag, seed a test user, add a login script, or use the connect strategy).
2. **Accept reduced functional testing coverage.** {ProductName} will still validate install, build, run, and health check — only runtime behavior verification of auth-gated endpoints is skipped.
### Manual steps for unsupported auth types
If {productName} can't figure out your application's auth automatically, you can prepare the environment yourself so that protected surfaces become reachable. Below are common patterns — pick the one that fits your stack.
#### Add a test-mode environment variable
Most frameworks have a way to relax or skip authentication in non-production environments. Add that variable to the **Environment Variables** section of the lifecycle setup page, for example:
| Framework / Pattern | Variable | Value |
| -------------------- | ------------------------ | --------------------- |
| Generic disable flag | `DISABLE_AUTH` | `true` |
| Rails / Devise | `RAILS_ENV` | `test` |
| Django | `DJANGO_SETTINGS_MODULE` | `myapp.settings.test` |
| Spring Boot | `SPRING_PROFILES_ACTIVE` | `test` |
| .NET | `ASPNETCORE_ENVIRONMENT` | `Development` |
| Express / Passport | `AUTH_ENABLED` | `false` |
{ProductName} re-validates after every environment variable change.
#### Seed a test user and add a login script
For session-based auth, you can create a test user and add a lifecycle script that logs in before tests run:
1. **Add a `bootstrap` script** (ordered before `healthcheck`) that seeds a test user:
```bash theme={null}
# seed a test user — adjust for your ORM / CLI
cd $WORKSPACE_DIR
python manage.py shell -c "
from django.contrib.auth.models import User
User.objects.get_or_create(username='testuser', defaults={'email':'test@test.com'})
u = User.objects.get(username='testuser')
u.set_password('testpass')
u.save()
"
```
2. **Add an `authcheck` script** (ordered after `healthcheck`) that obtains a session token and verifies a protected route:
```bash theme={null}
# login and verify a protected endpoint
TOKEN=$(curl -s -X POST http://localhost:8000/api/login \
-H 'Content-Type: application/json' \
-d '{"username":"testuser","password":"testpass"}' \
| jq -r '.token')
curl -sf -o /dev/null http://localhost:8000/api/protected \
-H "Authorization: Bearer $TOKEN" \
|| { echo "Auth check failed"; exit 1; }
```
3. **Store the credentials** (`testuser` / `testpass`) as **secrets** in the environment variables section so they are encrypted at rest.
#### Use the connect strategy with a pre-authenticated instance
When none of the above options work (e.g. OAuth with an external IdP that cannot be mocked), consider the **[connect strategy](/setup/build-environment/lifecycle-strategy#you-run-your-app-connect)**. Run the application yourself with authentication already configured, and point {productName} at the live, authenticated instance. {ProductName} skips install/build/run and only needs a base URL and health check.
***
## Editing and Re-validating
After making changes to scripts, environment variables, or the lifecycle document:
1. Click **Save Changes** to persist your edits
2. Click **Re-validate** to run the full validation sequence again
The **Re-validate** button automatically saves any unsaved changes before starting validation. During validation, a progress banner shows the current state.
If you only need to fix a small script error, edit the script inline, and click **Re-validate** - it handles saving for you.
***
## Lifecycle Discovery
For Modelcode Hosted projects, {productName} discovers the lifecycle configuration automatically at two points:
1. **During onboarding** - After you select the Modelcode Hosted build environment, {productName} analyzes the origin repository, identifies how to install, build, and run it, and creates the origin lifecycle configuration.
2. **During the foundation milestone** - When Milestone 1 starts, {productName} runs a lifecycle discovery step for the target repository. This ensures the target application can build and run before the agent begins writing migration code.
Discovery uses the codebase structure, dependency files, and common framework conventions to generate scripts. It then executes each script in sequence to verify the configuration works end to end.
If discovery cannot get the application healthy, the configuration is saved as **Draft** so you can review and correct it manually.
***
## Tips
* **Check the Errors tab first.** When a script fails, the stderr output usually points directly at the problem - a missing dependency, a wrong port, or a typo in the command.
* **Keep scripts minimal.** Each script runs in a fresh shell process. If two commands need to share shell context (e.g., activating a virtual environment before running a command), concatenate them with `&&` in a single script.
* **Use environment variables for configuration.** Avoid hardcoding ports, database URLs, or API keys in scripts. Set them as environment variables so they are easy to change and can be encrypted if sensitive.
***
## Related Docs
Choose whether the agent builds and runs your app, or connects to a running one
Run ModelDaemon on your own infrastructure for projects with private dependencies
Build environment terminology and mental model
How lifecycle discovery fits into the foundation milestone
How lifecycle configuration enables functional test execution, and where lifecycle script results are reported