> ## Documentation Index
> Fetch the complete documentation index at: https://docs.modelcode.ai/llms.txt
> Use this file to discover all available pages before exploring further.
# Azure DevOps Integration
> Connect your Azure DevOps account and configure organization access for Modelcode
Modelcode connects to your Azure DevOps repositories through **Microsoft Entra ID (Azure AD) OAuth**. This guide covers how to sign in with Microsoft, configure your Azure DevOps organizations for access, and create projects using your Azure DevOps repositories.
**Azure DevOps Server is not supported today.** Modelcode only works with
**Azure DevOps Services** (cloud). Support for Azure DevOps Server
(self-hosted) is planned for **H2 2026**.
## Prerequisites
* A Modelcode account (sign up at [modelcode.ai](https://modelcode.ai))
* A Microsoft account with access to one or more Azure DevOps organizations
* **Organization admin** access for the Azure DevOps organizations you want to onboard
## How It Works
Modelcode uses a **two-step** Microsoft authentication flow. You will see **two separate Microsoft login screens** — this is expected and required.
| Login | Purpose | What happens |
| ---------------- | ----------------------------------------------- | ---------------------------------------------------------------------------------------------------------------------------------------------------------------------------------------------------- |
| **First login** | Authenticates your identity via Microsoft Graph | You sign in on Modelcode's login page. This creates your Modelcode session and verifies who you are. |
| **Second login** | Authorizes access to Azure DevOps | Modelcode automatically redirects you to Microsoft a second time to obtain an Azure DevOps-scoped token. This token is what allows Modelcode to read your organizations, projects, and repositories. |
The two logins are required because Microsoft issues **separate tokens** for Microsoft Graph (identity) and Azure DevOps (repository access). They cannot be combined into a single sign-in. Modelcode handles the transition automatically — you just need to sign in when prompted both times.
Both logins go to the same Microsoft sign-in page
(`login.microsoftonline.com`). Use the **same Microsoft account** for both. If
Microsoft remembers your session from the first login, the second login may
show an account picker instead of a full password prompt.
## Signing In with Microsoft
### First Login — Authenticate Your Identity
1. Go to [modelcode.ai](https://modelcode.ai)
2. On the login page, click **Sign in with Microsoft**
3. You'll be redirected to Microsoft's sign-in page (`login.microsoftonline.com`)
4. Enter your Microsoft account credentials (work, school, or personal)
5. If prompted, complete any multi-factor authentication (MFA) steps
6. Microsoft redirects you back to Modelcode
At this point your Modelcode session is established, but Azure DevOps access is not yet configured.
### Second Login — Authorize Azure DevOps
Immediately after the first login completes, Modelcode shows a loading screen with the message:
> **"Connecting to Azure DevOps — please sign in when prompted..."**
After a brief pause you are redirected to Microsoft's sign-in page a second time.
1. Microsoft may show an **account picker** — select the same account you used in the first login
2. If this is your first time, you may see a **consent screen** asking you to grant Modelcode permissions to access Azure DevOps on your behalf — click **Accept**
3. Microsoft redirects you back to Modelcode
Once both logins are complete, you'll land on the **Projects** page with Azure DevOps connected.
If you are already signed in to Microsoft in your browser, the second login
may complete automatically without any visible prompt. This is normal — it
means Microsoft was able to issue the Azure DevOps token silently.
## Configuring Your Azure DevOps Organization
After connecting, Modelcode displays a **Setup Checklist** on the Projects page. You must complete these steps for each Azure DevOps organization and project you want to onboard.
If these steps are not completed, Modelcode will not be able to discover or
access your repositories — even though the Microsoft sign-in succeeded.
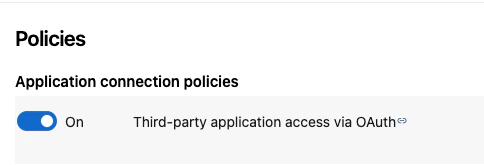
### Step 1: Enable Third-Party OAuth Access
Azure DevOps organizations block third-party OAuth applications by default. You must enable this policy for Modelcode to access the organization.
1. Go to your Azure DevOps organization: `https://dev.azure.com/{your-org}`
2. Click **Organization Settings** (bottom-left gear icon)
3. Navigate to **Policies** under the **Security** section
4. Toggle **Third-party application access via OAuth** to **On**
This is an organization-level setting. If you belong to multiple
organizations, repeat this for each one you want to onboard.
### Step 2: Add the Modelcode Application as a User
Modelcode's application identity needs to be added as a user in your organization so it can access projects and repositories.
1. Go to **Organization Settings** → **Users**
2. Click **Add users**
3. Add the Modelcode application identity (shown during onboarding or provided by your admin)
4. Set the **Access Level** to at least **Basic**
5. Grant access to the projects you want to onboard
### Step 3: Grant Project Administrator Permissions
For Modelcode to create branches and manage repository operations within a project, the application identity needs the **Project Administrator** role.
1. Navigate to the Azure DevOps project you want to onboard
2. Go to **Project Settings** (bottom-left gear icon)
3. Navigate to **Permissions** under the **General** section
4. Find the **Project Administrators** group
5. Add the Modelcode application identity to this group
Without Project Administrator permissions, Modelcode will be able to read
repositories but will not be able to create branches or push changes during
the migration.
### Repeat for All Organizations and Projects
These three steps must be completed for **every Azure DevOps organization and project** you intend to onboard to Modelcode:
| Step | Where | Scope |
| --------------------------- | -------------------------------- | ---------------- |
| Enable third-party OAuth | Organization Settings → Policies | Per organization |
| Add application as user | Organization Settings → Users | Per organization |
| Grant Project Administrator | Project Settings → Permissions | Per project |
If you manage multiple organizations, you can complete steps 1–2 for all of
them first, then work through step 3 for each project within those
organizations.
## Creating a Project with Azure DevOps Repositories
Once your organization is configured:
1. Click **Create Project** on the Projects page
2. Enter a project name
3. Modelcode automatically discovers all repositories across your connected organizations and projects
4. Select one or more repositories from the dropdown
5. For each repository, confirm or change the **origin branch**
6. Set a **feature branch** name (prefixed with `morph-`)
7. Click **Create Project**
Modelcode extracts the Azure DevOps organization and project from each repository automatically — no manual entry is needed.
## Approving a Migration Plan
When reviewing and approving a migration plan for an Azure DevOps project:
1. Open **Project Knowledge** from the **Roadmap** (**Modernization** → **Project Knowledge**) with **Project Spec** selected
2. Review the generated migration plan
3. For each new repository in the plan, select the **Azure DevOps organization** from the dropdown
4. Select the **Azure DevOps project** where the output repository should be published
5. Click **Approve**
The organization and project dropdowns are populated from your connected Azure DevOps account. If they are empty, verify that the setup steps above are complete.
## Troubleshooting
### "No Repositories Found"
If Modelcode says Azure DevOps is connected but no repositories are available:
1. Verify **Third-party application access via OAuth** is enabled (Step 1)
2. Confirm the Modelcode application identity is added as a user (Step 2)
3. Check that the application has access to the correct projects
4. Try clicking **Reconnect Azure DevOps** to re-authenticate
### "Azure DevOps organization dropdown is empty"
If the organization or project dropdowns are empty when approving a migration plan:
1. Ensure at least one organization has third-party OAuth enabled
2. Verify the application identity has been added to the organization
3. Refresh the page — the dropdowns are populated from a live API call
### "Why am I seeing two Microsoft logins?"
This is expected. The first login authenticates your identity with Microsoft Graph. The second login authorizes Modelcode to access Azure DevOps. Microsoft requires separate tokens for these services, so two sign-in prompts are necessary. See [How It Works](#how-it-works) above for details.
If the second login fails or you dismiss it:
1. Go back to [modelcode.ai](https://modelcode.ai) and sign in again
2. Both logins will repeat — complete them both
3. If you see an error like "interaction\_required", your browser may be blocking the redirect — allow pop-ups from `login.microsoftonline.com`
### "Second login shows a different account"
If the account picker during the second login shows accounts you don't recognize or defaults to the wrong one:
1. Select the same Microsoft account you used for the first login
2. If the correct account isn't listed, click **Use another account** and enter your credentials
3. Both logins must use the same Microsoft account for the connection to work
### "Permission denied" errors during migration
If Modelcode encounters permission errors when creating branches or pushing code:
1. Verify the application identity has the **Project Administrator** role (Step 3)
2. Check that the permissions apply to the specific project containing the target repository
3. If the project was recently added, wait a few minutes for permissions to propagate
## Next Steps
* [Quickstart](/quickstart) — Create your first migration project
* [Define Modernization Goals](/setup/modernization-goals) — Write effective goals for your migration
* [Modernization Instructions](/setup/modernization-instructions) — Learn how to review and approve your migration plan